Showing posts with label no recipe. Show all posts

Wednesday, October 9, 2013

Steaks, sans grill.

Sometimes I have conversations with my wife, and halfway through I realize I have stopped making much sense. Such was the case when Karen told me that she wanted to have steaks and I momentarily forgot that I was in control of making that happen.

Since I often have less working time than she does, I have taken to doing a lot of the menu planning and cooking. This works out great, because of the fact that I love to cook and love more to be in charge of all of the things that go on while cooking.

Not too long after our wedding, we were up at my mom's lake house near the lake of the ozarks. The weather can be unpredictable in the spring, so we were caught somewhat off-guard by a sudden rainstorm and I had to change from grilling to some other method for cooking the steaks we had purchased at the grocery store on the way in. I'd always read about how good cast-iron was for this particular purpose, but I hadn't really had a chance to try it out prior to this situation being thrust upon me.

While the first occasion was with a ribeye steak, our most recent steak adventure was with a sirloin of some variety that we purchased from target. Forget your fancy rubs and seasonings. For me, the best way to go about adorning your steak is salt and pepper only.

I really should have trimmed them, but a bit of fat is tasty.
After the salt and pepper, on both sides of course, is allowed to sit for a few minutes, and the steaks have come to something near to room temperature, they get placed into a very hot cast iron pan to sear for a few minutes on each side. Contrary to what you may have heard this does not 'seal in juices'. Quite the opposite actually as the increased heat actually does more cellular damage to the structures holding the water and various dissolved elements inside the steak. What it does do is create a flavorful browned layer on the exterior through a process called the 'Maillard reaction'. This is a similar process as what creates the brown crust on breads and baked goods.

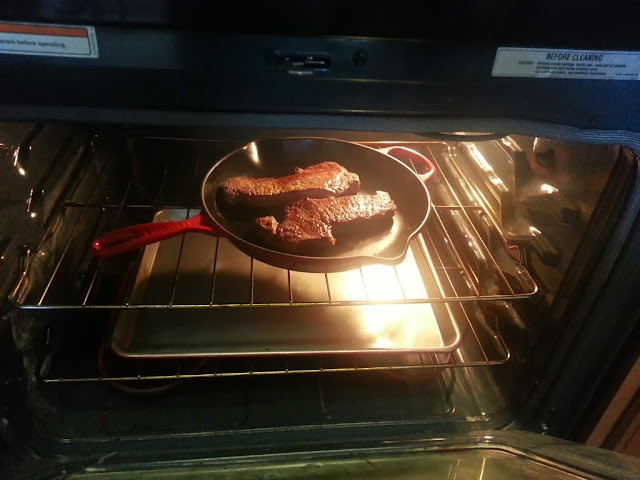
After searing another wonderful advantage of cast iron is revealed when you slide the whole pan straight into a preheated oven. Ours is most commonly set at 350, and the steaks cook for just under 10 minutes. Less if you prefer your steaks rarer than medium to medium well. More time if your steaks are thicker, or you prefer well done.

Into the hot-box! Use oven mitts!
After you remove your by now seared and wonderfully browned and fabulously smelling steaks, make extra sure to let them rest under foil for another 5 minutes or so. This will allow all of the juices that have been concentrated by the heat to redistribute themselves throughout your steak. Cut early, and a pool on your plate will be the result.

I kept the sides simple, as I wanted to make the beautiful steak the star of the show. I steamed some green beans, and sliced up a really interesting looking pretzel bread loaf I found at Whole Foods. Have I mentioned yet how in favor of the whole pretzel bread craze I am? It's quite a bit.

A light grind of salt and pepper for the beans and butter for the bread. A fantastic meal!
Hopefully this will inspire one of you, at the very least, to pick up a not-too-expensive cast iron pan, pre-seasoned please, and try your hand at seared and oven finished steaks.

See you next time!

-R

Wednesday, October 2, 2013

Roasted Hatch Chile Pepper Burgers

I think I may have mentioned before how bad it is that I discovered the fact that whole foods is about a mile away from where I work. On one of the post-work trips for produce, I discovered that it was nearing the end of the season for Hatch peppers.

As far as I can tell, Hatch peppers are grown pretty exclusively in New Mexico and are harvested in late August. The pods are long and slender and are a lighter yellow-green as compared to the dark green of a jalapeno. The heat level can vary wildly between varieties, from mild to extremely hot. I was sort of hoping that the ones I bought would fall more in the middle of the scale, but they turned out to be on the milder side.

Halved chiles being prepared for the broiler.
To start my burgers, first the chiles had to be roasted. Not being in possession of a fancy rotating gas powered roaster myself, I turned to the broiler to get the job done. I've used this method on bell peppers before and it has yielded consistently good results. Aside from the lovely roasted flavor this process brings, roasting chars the outside skin of the pepper making it much easier to remove prior to use. The skin on most chiles, at least the ones I have personally used, is very thin and almost waxy and unpleasant to eat. I peel any chiles I roast. A handy trick for the peeling is to let the chiles steam for 5 to 10 minutes in a paper bag or in a bowl covered with plastic wrap. The steam further loosens the skin.

Roasted chiles, before peeling.
After steaming it is often possible to peel the skin off in one or two large pieces, but often there are parts around the outer edge that are more stubborn. After peeling, I chopped the chiles into about 1/2 inch cubes and mixed them into the ground beef along with chopped onion.

It's at this point that I get to talk about one of my very favorite kitchen toys ever. The burger press.

Burger press and pre-cut parchment paper squares.
Shortly after we got married my wife and I went on a restrained but still somewhat extended shopping trip with some gift cards and other money we received from the wedding. This is definitely in the top 5 of my favorite post-wedding gifts.

The press is adjustable, for one, which means you can make anywhere from 1/4 pound burgers all the way up to 1 pound monstrosities. The parchment squares are especially useful if you plan to make a quantity of burgers and then freeze them for later, though I do also enjoy them just for the ease of handling and transferring the patties between whatever tray you're staging them on and the grill.

One square of parchment goes down on the bottom of the press, then the meat goes on top of the paper, and another paper goes on top of the meat. It's a little parchment paper burger sandwich.

All neat and orderly. Plus it keeps your press and tray clean!
Since we're not currently in a position to use an outdoor grill, due to the joys of second floor apartment living, I once again utilized the services of the panini grill to cook the burgers. Honestly it doesn't do a bad job. I still prefer a propane or charcoal grill, though.

Mmm, chiles.
While those were sizzling away, I simply sliced some more white onion and tomato, and pulled off a few leaves of this tiny head of butter lettuce I found in the produce dept. at target. I'm pretty fond of these tiny heads of lettuce especially for things like sandwiches and burgers.

Any opportunity to show off my knife.
At this point, tragedy struck. I was looking around for the hamburger buns and was shocked to find that they were entirely absent. Luckily I had purchased some small square ciabatta rolls for sandwich making a few days earlier. Crisis averted. Plus they were really good!

The finished product.
Thank you all for reading! Other than the minor snag with the hamburger buns this recipe was a total success. Perhaps in the future I will try again with a slightly hotter pepper. See you next week!

Monday, October 1, 2012

Pizza-nini

When I can, I like to come home for lunch.  Unfortunately, I have only 20 minutes total to assemble and eat lunch.  Usually this means I have leftovers or a grilled cheese sandwich.  This time the leftovers were mini pizza leftovers, but I didn't have time to mess with the oven and the 10 minutes of cheese melting.  What to do?

The solution: Make a mini-pizza sandwich and cook it in the panini press.  Voila!  The pizza-nini!

Looking good!

It turned out great, but it was very similar to eating a pizza pocket. Better than a pizza pocket to be sure, but certainly thematically similar.  


Mini Pizza

Here's a recipe that requires no recipe.  Here's the completely unnecessary recipe.

Mini Pizza!

Ingredients:
Bread of above average strength*
pizza sauce**
toppings***

1.  Preheat oven to whatever**** suits you
2.  Assemble mini pizzas
3.  Bake in oven until heated through and cheese is all melty, if you even used cheese.
4.  Let cool as long as you can stand it
5.  Put it in your face.


Before baking.  Left: Canadian Bacon and Pineapple.  Right: mini-pepperoni

After baking.  Mmmm...melty cheese....


*We used Filone rolls.  I hear english muffins work too.  What is a Filone roll?  I don't know, but we saw them at Target in the fresh bread section and thought they looked about right.

Filone 

**Pizza sauce can be anything goopy and tasty.  Spaghetti sauce, alfredo, garlic butter, whatever.  I used a pretty awesome no-cook pizza sauce recipe that was embedded in America's Test Kitchen's recipe for Thin-Crust Pizza.  If you're an Amazon Prime member, you can watch season 12 for free.  The no-cook pizza sauce recipe is in there, episode 8. You can also find the recipe on their website for free, but you do have to register.

Pretty awesome no-cook pizza sauce

***Pizza toppings: usual or unusual, meaty or veggie, anything goes!

****Our oven's default is 350, so that's what we went with.  However, the oven thermometer (which can also lie) said it was closer to 250.  The point is, nobody knows what temperature it was really at, but it was in there for about 10 minutes.